Self-Drafted Knit Sweater: Intarsia & Sleeve Adjustments
Learn from a knitter's journey: self-drafting, intarsia, choosing yarn, and adjusting sleeves after completion. Tips for custom-fit sweaters.
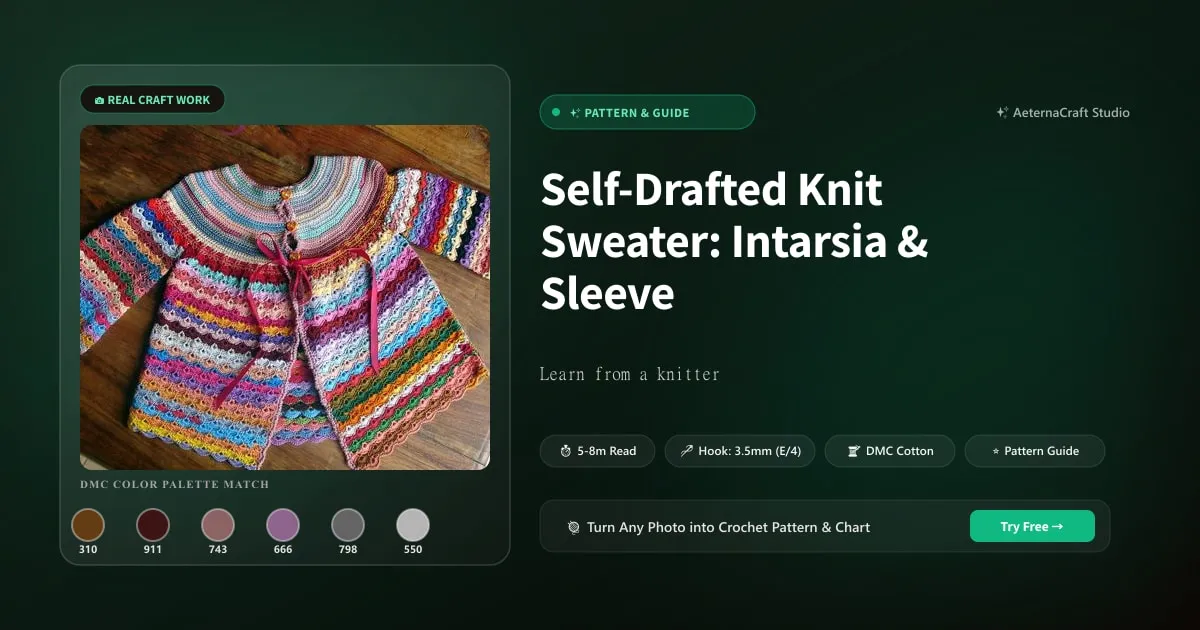
Planning for Sleeve Adjustments: Avoiding the Second Set
Let’s be honest: measuring for sleeves is where most of us trip over our own yarn tails. I’ve been chasing perfect fit for over two decades, and I can tell you right now that guessing your arm circumference will cost you hours—or worse, an entire second sleeve. Years ago, I nearly finished a cozy winter pullover only to realize the left sleeve was snug enough to qualify as a compression garment. So I knitted another one from scratch. Don’t let that happen to you. Grab a soft measuring tape and pull on a well-fitting sweater you already love. Wrap the tape around your upper arm, right under the bicep, and then again around your forearm. Add 2 to 3 inches of ease if you want that relaxed, library-cozy drape. For a tailored look, stick to 1 inch.
One question I get asked constantly is, “Do I really need to swatch in the round for intarsia sleeves?” Absolutely, yes. Flat swatches lie differently than tubular knitting. I always cast on 40 stitches of my chosen DK weight wool blend, join in the round without twisting, and work until I hit 12 inches. If my gauge reads exactly 7 stitches and 10 rows per 4-inch square, I’m ready to calculate. Let’s say your finished arm circumference is 14 inches. Multiply that by 7 to get 98 stitches. Round up to a multiple of 8 for your ribbing pattern, add 2 for the selvedge edge, and you’re sitting at 100 stitches at the underarm.
But what happens when you’re twenty rows down the sleeve and suddenly realize it’s running an inch too narrow? I’ve ripped back countless times, but sometimes you don’t have the heart to undo good progress. Here’s my go-to trick: gradually increase stitches every four rounds starting from the elbow. Cast on 2 stitches under each armpit seam, knit them together on the next round to hide the bumps, and distribute 4 extra stitches evenly across the lower sleeve. Do the math quickly: divide your remaining sleeve length in inches by the number of increases you need, then multiply by 4 to find your interval. It’s not rocket science, just basic math dressed up in fiber form.
When I first tried manipulating tension mid-sleeve, I used a size H/8 (5.0mm) needle to pick up stray loops along the gusset, which actually helped keep the fabric from puckering. Thankfully, swapping to a 4.0mm needle for the cuff ribbing brought everything back into alignment. If you’re working with something slippery like mercerized cotton or a plush alpaca, the fabric might grow faster than expected, so always check your progress against a paper pattern you drafted yourself. I even keep a spare set of double-pointed needles in my knitting bag just in case I need to pick up stitches after a strategic rip-back. When tension gets stubborn, I sometimes switch to a 3.5mm hook and work a quick row of slip stitch (sl st) or half double crochet (hdc) to stabilize a loose edge before returning to my needles. Even a traditional treble (tr) or single crochet (sc) rescue can anchor a unraveling seam.
A lot of crafters ask, “Is short-row shaping worth the headache for sleeves?” Honestly, it’s a lifesaver if you’re drafting for dropped elbows or wanting that vintage, slightly draped silhouette. Instead of fighting your gauge, embrace it. Mark your increases with waste yarn, keep a tight notebook log, and remember: a well-measured sleeve means you never have to knit two identical ones just to cover your tracks. Next time we’ll talk about how to keep your project alive when life throws a month-long curveball at your knitting.
Managing Motivation After a Long Break
We’ve all been there. You finish a whole sweater body, cast on the first sleeve, and then suddenly, life demands your attention. A deadline slips, a family member falls ill, or you just stare at your needles until the yarn looks like a tangled mess of guilt. Last winter, I packed away a half-finished worsted alpaca cardigan and stepped away for thirty-two days. When I finally unwrapped it, the colorwork looked alien, my notes were buried under mail, and I genuinely wondered if I’d ever find the rhythm again. The good news? You absolutely will. You just need a gentle bridge back to your work.
Start by laying everything out exactly where you left off. I keep a small wooden box labeled “In Progress” right next to my reading chair, so nothing gets lost in the laundry hamper. Flip through your project notebook and trace your latest stitch chart with a finger. Read your margin notes out loud—they’re usually written in the voice of your past self, and honestly, it’s hilarious how dramatic we get. “Row 47: This stripe is eating me alive.” Yeah, Me. Three weeks ago. Now? You’ll probably chuckle. Then, commit to the two-row rule. Knit just two rows before you allow yourself to walk away. Two rows takes about six minutes. Six minutes often turns into an hour, but even if it doesn’t, you’ve broken the inertia barrier. I swear by it.
Another common worry I hear is, “What if my tension changed while I was gone?” Check your gauge with a scrap piece of the same yarn weight—fingering, DK, or bulky—and compare it to your original swatch. If your stitches feel tighter, switch to slightly larger circulars, maybe jump from 4.5mm to 5.0mm just for the transition rounds. If they’re loose, drop down to a 3.5mm needle and work a few rounds of slip stitch along the edges to firm things up. Sometimes a quick spritz of steam from an iron helps reset memory fibers, especially with wool or wool-alpaca blends.
Burnout creeps in quietly. You knit too much, too fast, chasing a deadline that isn’t real. I used to push myself to finish a lace panel in a week, only to end up with stiff, unblocking-ready fabric and zero joy. Now I schedule deliberate breaks. One full week off per month isn’t slacking; it’s strategy. During those downtime periods, I swap to a completely different fiber art. I’ll grab a 4.0mm hook and work through a simple double crochet (dc) blanket for a neighbor, or sort my yarn stash by dye lot while listening to audiobooks. Keeping your hands busy with low-stakes projects maintains the creative muscle without demanding your soul.
When you return to your sweater, ask yourself: “Am I excited to fix this neckline, or am I dreading the seam joining?” If dread wins, pause. Put it in a basket for three days. Work on a small giftable item instead. Re-entry should feel like slipping into a favorite robe, not wrestling with a garden hose. I always mark the return day with a fresh cup of chamomile tea and a playlist that matches the season. Motivation isn’t a fire; it’s a slow-burning ember. Tend it gently, shield it from drafts, and it’ll glow exactly when you need it most.
Mastering Intarsia with Soft, Blended Yarns
Picking the right yarn for an intarsia sweater feels like choosing a roommate for a long cross-country road trip. You want someone soft, reliable, and preferably not prone to splitting every time you change colors. When I draft a design, I lean heavily toward merino/cashmere blends for their plush hand-feel, but I’ve learned the hard way that not all warm fibers play nice together. Pure alpaca loves to bloom and soften over time, yet it lacks crisp stitch definition. Mercerized cotton offers incredible clarity, but it drapes like liquid and fights back if your tension drifts. Acrylic is forgiving and machine-washable, though it rarely breathes well enough for a sweater meant to layer under coats. Silk adds a gorgeous sheen and lightweight drape, but it’s notoriously slippery and unforgiving for beginners juggling multiple bobbins. My current favorite? A 70% merino, 25% baby alpaca, 5% silk blend worked at DK weight. It gives me cloud-like warmth, keeps my motifs sharp, and behaves itself when I’m chasing a complex geometric layout.
Speaking of complex layouts, tension is where intarsia usually goes sideways. I’ve spent entire evenings frogging because one color pooled while the other went taut enough to snap. The secret isn’t force; it’s preparation. Cut your color lengths so they’re roughly twice the width of your motif plus a few inches for maneuvering. Wrap each bobbin neatly, and never pull the yarn tight when you turn back at the edge. Instead, twist your two working strands once where they meet, creating a little anchor that prevents holes. Some crafters prefer the stranded method for smaller blocks, but for large color blocks, individual bobbins or mini-skeins work best. I even stash a few 4.0mm and 3.5mm crochet hooks in my kit to help untangle snarls. If a strand twists incorrectly, a quick single crochet (sc) fix can reset the loop before it propagates across the row.
A frequent question I get is, “Should I use smaller needles for colorwork sections?” Sometimes. If your main fabric knits beautifully on 5.0mm circulars but the charted panels feel loose and open, drop down to 4.0mm just for those 30-row segments. Switch back afterward, and block aggressively to marry the tensions. I always work one test swatch per new yarn combination, measuring the tension with a rigid ruler rather than eyeballing it. Stretched fabric lies; flat fabric tells the truth.
Blocking deserves its own spotlight. Wet blocking or steam pressing evens out minor inconsistencies, especially with natural fibers. Lay your gauge swatch flat, pin it to exact dimensions, and let it dry completely. If your intarsia motifs still appear puckered post-block, your carry-overs might be too long, or you’re dragging yarn behind unused colors. For true intarsia, never drag. Drop to a new ball every time you change hue.
Honestly, watching a perfectly tensioned colorblock sweater come together is one of those quiet victories that makes all the fussy bobbin-tangling worthwhile. You’ll know you’ve nailed it when the seams lie flat, the motifs sit proud without cave-ins, and the inside looks almost as tidy as the outside. Next, we’ll walk through how to document every inch of this journey so you can eventually share your masterpiece with the world.
From Self-Drafted to Published Pattern: A Roadmap
There’s a peculiar magic in sketching a sweater on graph paper, calculating repeat intervals, and watching your own mind take physical shape on needles. I’ve worn a handful of self-drafted pieces over the years, and each time I remove them, I wonder why I don’t write them down properly. Too many designs live only in my head or in a coffee-stained notebook until they fade into forgotten drafts. Publishing your pattern shouldn’t feel like climbing a mountain; it just needs a steady ladder.
Start documenting as you knit. I keep a dedicated ring binder with loose-leaf pages divided into gauge, stitch counts, row markers, and schematic sketches. Every time I hit a significant transition—say, joining the body, shaping the yoke, or finishing the sleeve—I log the row number, stitch count, and needle size. I also photograph the piece at seven key stages: raw gauge swatch, first 2 inches of body, underarm join, halfway up the yoke, sleeve complete, cuff finished, and blocked final garment. These photos become your visual roadmap later, and they save you when you realize you forgot to note whether you increased on the right or left side of a raglan.
When the sweater is done and you’re ready to draft the instructions, resist the urge to rush. Write for a fictional knitter who knows how to cast on, bind off, and read a tape measure, but has never touched your specific design. Break complex sections into bullet points. Use clear abbreviations, but define them upfront. If you’re drafting for multiple sizes, grade your increases systematically. For example, move from size Small to Medium by adding 6 stitches at the underarm, then distribute those 6 stitches across the yoke by increasing 2 stitches every other row on each side. Run the math twice. I once submitted a draft where the chest measurement jumped 8 inches between Medium and Large because I miscalculated my stitch multiples. Ouch.
Test knitting is non-negotiable. Invite three people with different skill levels to knit your pattern, and pay them in store credit or finished garments if possible. Ask them to flag confusing phrasing, missing ends-to-weave counts, or gauge discrepancies. Collect their feedback in a shared spreadsheet. Track every change you make based on their notes. Once the draft holds water, format it cleanly. I use a dedicated pattern template to arrange instructions, charts, and diagrams. Keep charts aligned to 10-square increments for readability.
Before uploading to Ravelry, double-check your copyright wording and licensing terms. Most designers offer personal-use licenses only, reselling or redistributing the digital file outright is a hard no. Price your pattern thoughtfully—factor in your design time, test knitter compensation, editing, and photography hours. I always quote out loud to myself: “If a stranger paid me for an hour of my day, would this pattern be worth it?” If the answer hesitates, adjust the price or refine the draft.
Many crafters ask, “Do I really need professional photography?” Not strictly, but your photos dictate sales more than any other factor. Shoot in natural light, against a neutral backdrop, and show the garment on a live person, a dress form, and laid flat. Capture the inside seams to prove your craftsmanship.
Publishing your first self-drafted pattern feels terrifying, then incredibly freeing. You’re sharing years of trial, error, and tea-stained calculations with strangers who will likely thank you for making their winters cozier. And honestly, there’s no better feeling than watching someone wear a sweater you sketched, measured, and typed out alone. Now, go cast on, take notes, and trust the process. Your pattern deserves to exist.
Frequently Asked Questions
Do I really need to swatch in the round for intarsia sleeves?
Absolutely, yes. Flat swatches lie differently than tubular knitting. I always cast on 40 stitches of my chosen DK weight wool blend, join in the round without twisting, and work until I hit 12 inches. If my gauge reads exactly 7 stitches and 10 rows per 4-inch square, I'm ready to calculate.
Is short-row shaping worth the headache for sleeves?
Honestly, it's a lifesaver if you're drafting for dropped elbows or wanting that vintage, slightly draped silhouette. Instead of fighting your gauge, embrace it. Mark your increases with waste yarn, keep a tight notebook log, and remember: a well-measured sleeve means you never have to knit two identical ones just to cover your tracks.
Should I use smaller needles for colorwork sections?
Sometimes. If your main fabric knits beautifully on 5.0mm circulars but the charted panels feel loose and open, drop down to 4.0mm just for those 30-row segments. Switch back afterward, and block aggressively to marry the tensions. I always work one test swatch per new yarn combination, measuring the tension with a rigid ruler rather than eyeballing it.
Related Posts
How to Knit a Birthday Hoodie: 7 Custom Sweater Tips
Learn from a viral Reddit post on knitting a birthday hoodie. Get tips on pattern selection, sizing, yarn choices, and finishing techniques for a perfect fit.
AdvancedAnti-Piracy Sweater: Crochet Your Own Statement Piece
Learn to crochet an anti-piracy sweater inspired by the 2000s ad, with tips on avoiding AI pattern scams and customizing your design.
Try Our Free Crochet Tools
Turn Your Photo Into a Crochet Pattern
Upload any photo and our AI generates a pixel-perfect crochet pattern with real yarn color matching in seconds.
Try AeternaCraft Studio Free →Calculate Yarn for Any Resize
Free amigurumi yarn & resizing calculator. Change hook, switch yarn, or scale a whole pattern — instant results with PDF export.
Open the Calculator →